– 3 Night Itinerary Using The Calabazo Entrance in Tayrona Parque Nacional –
23 Dec 2019 By James/ LOST SOULS AND PIONEERS.
Tayrona Parque Nacional can be found on the coast of Colombia and is home to some of its finest beaches and most precious animals. Jaguars can be found here but its unlikely you will see one, however that’s no reason to skip this beautiful treasure especially if you are using the calabazo entrance.
The Parque is well known and usually finds it way onto most travellers itineraries. However, most of them use the main busy entrance and this guide will help you plan a spectacular trip from the lesser known and hardly used entrance at Calabazo via some of the most secluded spots.
We stayed inside the park for 3 nights and left on the fourth day. It could be cut down to 2 nights, but you would miss one of our favourite campsites near the end of our itinerary.
Latest park Information here.
Quick overview
Recommended time: 3 nights, could stay longer.
Recommended route: Calabazo entrance – Playa Brava – Cabo San Juan/ Arecifes – Camping Castilletes – leave park
The above route could also be done in reverse, but it makes more sense to do it this way to miss the crowds and the busy Zaino entrance.
Cost:
310k Peso Per person for 3 nights. It could be done cheaper if you were to cook your own meals.
Highlights:
Playa Brava, La Piscina and Camping Castilletes
Getting to the park
It’s easy to get there as only one road passes both park entrances. Buses usually have the destination in the window. Double check the destination with the conduction or driver when getting on.
From Santa Marta
You can catch the public bus which will either be to the Zaino entrance or to Palomino. The bus costs ….. and you can catch it from the corner at Calle 11 Carrea 11. Takes around 1 hour. The bus was easy and felt pretty safe.
You could also get a taxi but we aren’t sure how much as the bus is excellent.
From Minca
You may be coming from Minca and you have a couple of options.
First option is to take the collectivo from Minca back to Santa Marta (near the central market) which is close to where you can catch the bus as per above.
Second option is to ask the collective to stop as close to (11.223802, – 74.161859 )the gas station as possible. From the gas station you can wait at the side of the road/ small bus stop and wait for a bus heading to Tayrona or Palomino. Buses are frequent and they always go this route so it should be easy enough to catch a bus.
From Palamino
Catch the public bus heading back to Santa Marta and ask for Tayrona. It should only take around 1 hour and cost around 7k. But we can’t be sure as we didn’t take the bus from Palomino.
Which entrance
You may not be aware but there are two entrances you can use to enter the park. This guide is based around the lesser known Calazbazo entrance.
Zaino ( 11.281500, -73.914870)
The main one is Zaino which is the most popular with day trippers and people with this time to spare. From what we saw and what we have read this one is very very busy.
You usually have to que to get your tickets and also watch a video about the park before entering. We only really recommend this one if you want to do a day trip or love the crowds.
Calabazo (11.284903, -74.001706)
The other entrance is called Calabazo ( co ornidates) which is much quieter, much easier and much faster to enter. No ques, no tourists, no video. This entrance is brilliant.
You can walk down the path to find someone waiting there to take your park entrance fee. They give you your tickets and wristband and off you go. We did not see any other tourists at this entrance and only 2 other people waking in the opposite direction on the first day.
Entrance fee
Low season: 53K Pesos
Insurance: 2.5k pesos per person per day
There is a mandatory insurance for each day inside the park.
Both entrances cost the same. The fee allows you access to the park for as long as you want providing you do not leave. If you do you will have to pay to enter again.
Itinerary
It is best to stay just outside the park the night before and get to the park when it opens the next day to begin a day walk or longer trek.
We stayed at La Katia Creative hostel just outside the Calabazo entrance. It was the perfect overnight stop with a good kitchen and a beautiful river close by to take a quick dip. They also allow you to safely leave your big bags here while inside the park.
All the walking routes inside the park can be found on maps me which gives a pretty accurate walking time and shows the ascents/descents in a graph. Download the offline maps beforehand.
I highly recommend good walking shoes or a good pair of trainers at the very least. The trails can also become very muddy if you get some rain.
Day 1
Calabazo entrance to Playa Brava
Having set off early we made it to the park entrance around 7.15am. To get to the entrance we walked along the trail and found a lady sitting by a small hut and table with a price list behind her. All we had to do was pay for our tickets and get the wrist bands then in we went.
The trail starts light and soon becomes uphill for atleast the first hour or so. Leave as early as possible to avoid the heat. We were dripping with sweat within minutes. The path is easy to follow and you wont need to turn off untill you make it to a sign pointing left saying Playa Brava.
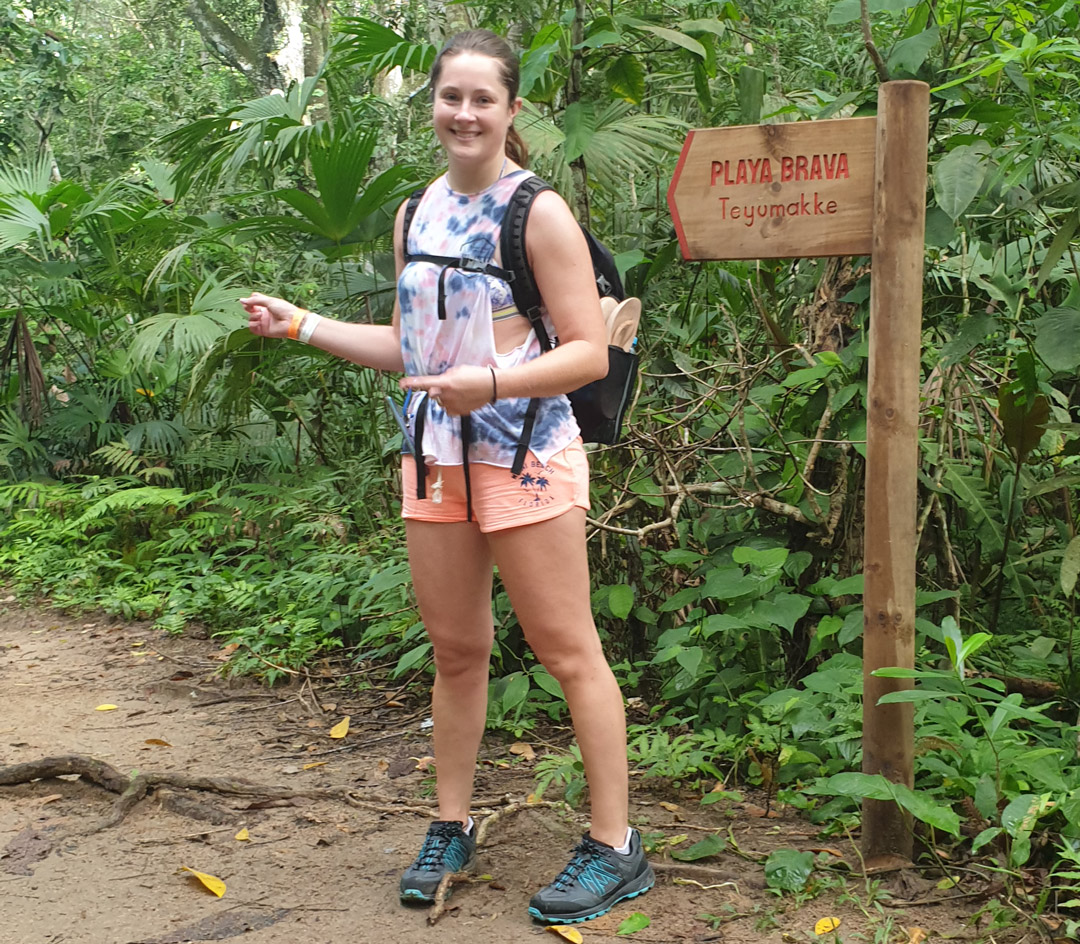
Dont miss the sign for Playa Brava
Make sure you take this trail where it will begin to descend and eventually bring you out to Playa Brava. It took us around 3 hours to complete. We arrived around 10.30am. This is where you should stay for the first night. We paid for a hammock and rested Before enjoying the beach and waterfall.
ABOUT PLAYA BRAVA
This place is completely isolated and is a fantastic stop. There is only enough space for so many people so it never gets overcrowded. We pretty much had the beach to ourselves. The camp has toilets and cold showers which was very nice after the sweaty hike.
Another hidden gen is a beautiful little waterfall to visit which is an easy 20-minute flat walk from camp making it the pefect swimming spot to cool off.
Take time to enjoy a peaceful and beautiful beach with amazing views. (NO SWIMMING HERE) Please follow the signs and do not swim due to dangerous conditions. A paddle is ok.
Sleeping
You can book a hut here on booking.com or turn up and purchase a hammock to sleep in like we did. The hammock comes a mosquito net and a blanket. They are under cover but do get abit damp and cold at night. I found it suprisinglycomfortable.
Eating
For dinner everyone all eats at the same time and they give you a choice of beef, fish or vegetarian. The food was really nice, and they also offer breakfast and lunch if you choose. We brought our own snacks.
Our Costs
Hammock with mosquito net : 35K
Dinner: 30k

Playa brava beach

Playa Brava camp area
Day 2
Playa Brava to Cabo San Juan / Arrecifes beach
Again, the route can be found on maps me
On the second day I recommend again leaving as early as possible to avoid the heat. To get on the right trail you need to head back towards the main buildings in Playa Brava and instead of taking the path you came from yesterday you head to the left. The trail is marked by a sign. This is a new trail to Cabo San Juan and means you don’t have to double back on yourself.
The trail is mostly uphill for the first hour and a half.It is well trodden and if you are unsure where to go look for areas that look worn down or most trodden on the ground and check maps me for directions. The trail is easy to follow, and you will eventually need to take a left onto the main trail.
This trail leads downhill to a small beach “la nudista” which as the name suggest is an unofficial nudist beach. Turn right when facing the water and the trail will take you to Cabo San Juan.
We stayed here for the night mostly because we wanted to stay somewhere that we could swim and enjoy the beach. However, Arrecifes beach also looked really nice and is probably slightly cheaper and less busy. If we did it again, we would probably stay at Arreciefes.
To get to Arrecifes you need to continue along the trail for another 45 minutes passing La Piscina beach.
About Cabo San Juan Beach
This is the busiest spot in the park because of its beautiful and swimmable beach. Cabo is possible to visit in a day trip so many locals and tourists do just that. The beach is very busy during the day but does quieten down when the day trippers leave. However, it is still a very popular place for locals to stay over and camp at weekends including those travellers who are staying for just the 1 night inside the park.
The camp has decent toilets and showers, but they do get busy. There is the option to do a snorkel tour from here, but I would advise brining your own and heading to La piscina. you will also find a small lagooon nearby that could contain caiman crocs so do not swim here. Read the warning signs.
If you have the time and energy you can make a short 20-minute walk to La Piscina beach which is a good snorkel spot. More on that below.
Sleeping
The upside to all this business is you can rent a tent which comes with two single mattresses and pillows. The tents are really clean, and way better than we was expecting. You can also pre book a hammock either online or at the main Zaino gate when buying your entrance ticket.
To book the tents and hammocks there is a small shack to the right of the beach. You will see it as you come into Cabo if arriving from the Zaino entrance or it will be as if you are leaving Cabo if arriving from Playa Brava.
Eating
There is a decent restaurant here and a small shop. Meals start around 17k for basic pasta. The food wasn’t bad and portions sizes were good. There is also a couple of people selling snacks and sandwiches around the main beach area.
Our Costs
Tent: 40k PP
Dinner 35k rice and veg and fried chicken and chips
Beers: 5k Aqua 3k
Snacks and drinks available
Arreciefes beach
We didn’t stay here but went through and it looked really nice with a similar setup to Cabo. I have read it is much quieter here and a little bit cheaper. Just remember, NO SWIMMING.

View From On The Rocks

Cabo San Juan From the Lookout
Day 3
Cabo San Juan/ Arrecifes to Camping Castilletes Via La Piscina
As before, leaving early to miss the heat is preferable and to avoid the day trippers at La Piscina beach. From Cabo the trail is more used and very easy to follow so you shouldn’t get lost. It does begin with some gentle uphill sections but its only a short 20-minute walk until you reach La Piscina beach.
La Piscina
Long golden beach and crystal-clear water make this a must visit spot. It is also the best spot on the trail for snorkelling. There is a reef a couple of hundred meters offshore making it a safe calm spot to swim and snorkel.
We snorkelled out to the reef and saw a variety of fish. Do be careful leaving your belongings but it didn’t feel unsafe leaving our bags on the shore. Some people spend the day here but stay at Cabo or Arrecifes, we just stopped for a swim.
Onwards
After La Piscina it’s an easy 25-minute walk to Arrecifes beach. We continued along the trail passing countless people heading the other way towards Cabo. Some of the views along the way are fantastic. There is several look out points and the view when crossing over the large boulders looking out to sea is simply beautiful.
The path is well made with sturdy stairs and walkways going up and back down several rocky areas. Keep on the lookout as we saw a family of monkeys playing for a good 15 minutes just next to the trail.
Soon enough you will be back to civilisation and a paved road. From here we walked the paved road until you see the sign for Camping Castilletes on the left. Total walk time was around 2 – 3 hours depending on breaks and stops etc.
Camping Castilletes
This was our favourite campsite. Being just inside the park entrance it wasn’t overly busy but had great facilities (including wifi) and tents which are pitched right on the beach with a sea view. The site has great toilets and showers and a restaurant with small tuck shop.
You will find a large and beauitful(quite) beach which is great for relaxing or taking a stroll. NO Swimming unfortunately but we did go down to the shore and get our feet wet.
We really loved this place and it is overlooked by people exiting or even entering the park. It makes for the perfect start or finish to the trip.
Sleeping
You can hire tents hammocks and little cabanas. The tents come with a clean double matress and pillows. Bring a sleeping bag liner in case you get cold but we didn’t really use it.
Eating
The restaurant onsite does various meals costing around 20k. For 10k pp extra you can pay for breakfast when booking the tent. The breakfast included eggs and toast with coffee or hot chocolate.
Costs
Tent 60k. 30kpp for two people
Dinner 20k fried chicken and chips
Lunch: 26k pasta and sprite
Breakfast 10k
Beer: 5k

Chilling In The Hammock Just Infront Of The Tents

Tents On The Beach Facing The Ocean
Day 4
Camping Castilletes to exit
We had a chilled morning and left the camp around 10am. The walk to the exit is less than 1 hour. When we left, we saw the ques and tourists at the gate and were so glad we took the route we did. We took a bus back to our hostel, got our bags and headed on to Palomino.
Where to next?
From the Zaino entrance/ exit it’s easy to get a public bus to Santa Marta or Palomino. Just stand on the correct side of the road and flag down a bus that will have either destination written on it and usually the conductor shouting the location.
To Santa Marta
When leaving the entrance, the buses to Santa Marta will run from the left going toward the right. The cost is 8k taking 1 hour.
To Palomino
Buses will be running right to left when looking at the road if you have just left the park. Best to cross the road to catch the bus. Zaino park entrance to Palomino costs around 7k and takes around 1 hour.
To Minca
First take the bus to Santa Marta. You need to get off as close to the central mercado as possible. Say this to the driver when you get on.
Next you will need to catch a collective (shared taxi) from Calle 12 Carrera 9. There is a small shop where you can buy your ticket. Say to locals Minca if you are unsure and they will point you in the right direction. Luggage usually goes on the roof of the collevtivos. The cost is 8k pp per way.
Tips
- Take as much cash as you think you will need. NO ATMS NO CARD PAYMENTS
- Wear decent trainers or trekking shoes
- Take a sleeping bag liner in case it gets cold at night
- Pack light – you really don’t need much
- Take a reusable bottle. We used LifeStraw so could drink the tap water saving plastic and money
- Don’t forget bug spray
- Hit the trail early before the heat
If you want to save money inside by bringing food do your shopping in Santa Marta for the best prices and selection because the stores near the Calabazo entrance were not well stocked
If we did it again
The only thing we would have probably done different is stay at Arrecifes beach instead. Purely because it would have been a little less busy and we like that. However, do consider the extra walking and not being able to swim there.
What to pack?
Leave your big bag at a hostel near the entrance. Take only a small backpack.
- Reusable water bottle / water
- Walking boots or trainers and flip fops
- Towel and swim wear x 1
- Minimum products. We took shower gel, toothpaste and toothbrush
- Raincoat
- Optional thermal top (in case it got cold at night) the hammock did get chilly
- Underwear and socks (how many depends on you)
- 1 x shorts to walk in and 1 x shorts for the evening
- 2x light t shirts for walking and 1x t shirt for the evening
- Cameras and power bank. Playa Brava has no power the other sites have limited charging
- Sun cream, hat, shades and BUG SPRAY
Conclusion
Seriously consider what type of experience you want, and we actively encourage you to follow this route using the Calabazo entrance. We had a fantastic experience and suggest 3 nights as the minimum to get the best experience.
The park can be pretty busy and a little touristy which is why the lesser known entrance is better and your experience will not be one of racing other tourists into the park.
Other Posts
Could you be suffering travel fatigue ? Find out Here with our latest post on the cure to travel fatigue
We are Scarlett and James from a small town in the UK and currently exploring this big world together and trying to find a cure to the travel bug we caught on our last adventure to Australia and South East Asia.
We met in our home town and after being together 1 month we set off on our first adventure. It would either work or it wouldn’t, right? And here we are today five years later and back at it again.
Error: No feed found.
Please go to the Instagram Feed settings page to create a feed.
If you become aware of any changes or see any mistakes, please let us know so we can update accordingly for the benefit of all our fellow travellers. We try our best to give you accurate information but make sure you do your own research as well we won’t be held liable if you do not check the information for your own circumstances as each traveller is different.
All content on this site is owned by LOST SOULS AND PIONEERS and cannot be used without our consent.
